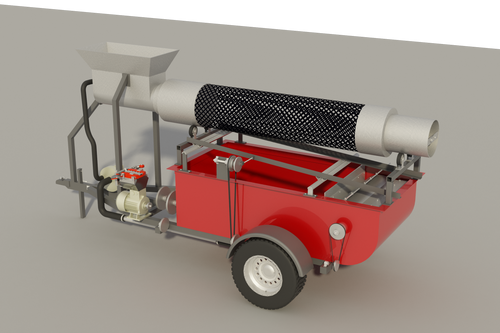
Gold prospecting can be an exciting and rewarding hobby, and having the right equipment can make all the difference. One essential piece of equipment for any gold prospector are trommels, a rotating cylindrical screen used to separate materials by size, making the process of sifting through dirt and gravel much more efficient. While commercial trommels can be expensive, building your own at home is a cost-effective and rewarding project that allows you to customize it to your specific needs. In this guide, we'll walk you through the materials and tools required, provide step-by-step instructions for constructing your trommel, and share tips for optimizing its performance to ensure you get the most out of your gold prospecting efforts. Whether you're a seasoned prospector or a beginner, creating your own trommel will enhance your gold hunting adventures and increase your chances of striking it rich.
Essential Materials and Tools for DIY Trommels
Building your own trommel at home is a rewarding project that requires a careful selection of materials and tools. Before you begin, it’s essential to gather everything you'll need to ensure a smooth and efficient construction process.
Materials
- Metal Drum or Cylinder: The core of your trommel is a metal drum or cylinder. A 55-gallon steel drum is a popular choice due to its durability and availability. Ensure that the drum is free of any hazardous materials and in good condition.
- Screen Mesh: Select a sturdy screen mesh to fit inside the drum. The mesh size will determine the size of the particles you want to separate. Stainless steel or galvanized steel mesh is recommended for its strength and resistance to rust.
- Metal Frame: Construct a stable frame to support the rotating drum. Angle iron or steel tubing works well for this purpose, providing the necessary strength to handle the drum's weight and movement.
- Bearings and Axle: Bearings are crucial for the smooth rotation of the drum. You'll need a pair of heavy-duty bearings and an axle to mount the drum securely to the frame.
- Motor and Drive System: A small electric motor will drive your trommel. A motor with a variable speed controller is ideal, allowing you to adjust the rotation speed. You’ll also need a drive belt or chain system to connect the motor to the drum.
- Hopper and Chute: Create a hopper to feed material into the trommel and a chute to collect the sorted material. Metal or durable plastic works well for these components.
- Bolts, Nuts, and Washers: Secure all the parts together with bolts, nuts, and washers. Stainless steel hardware is preferred for its resistance to rust and corrosion.
- Paint: Protect your trommel from the elements with a coat of rust-resistant paint. This will extend the life of your equipment, especially if you plan to use it in outdoor environments.
Tools
- Welding Machine: A welding machine is essential for assembling the metal parts of your trommel. Ensure you have the necessary welding skills or enlist the help of a professional.
- Angle Grinder: An angle grinder is useful for cutting and smoothing metal parts. You'll need various cutting and grinding discs for different tasks.
- Drill and Drill Bits: A power drill with a selection of drill bits is needed for making holes in the metal parts for bolts and screws.
- Measuring Tools: Accurate measurements are crucial for building a functional trommel. Have a tape measure, a square, and a level on hand to ensure precision.
- Wrenches and Pliers: These basic hand tools are essential for tightening bolts and securing parts during assembly.
- Safety Gear: Always prioritize safety by wearing protective gear, including safety glasses, gloves, and a welding helmet.
By gathering these materials and tools before starting your project, you’ll be well-prepared to build a sturdy and efficient trommel. Proper preparation ensures a smoother construction process and a more reliable piece of equipment for your gold prospecting adventures.
Step-by-Step Guide to Constructing Your Trommel
Building your own trommel may seem daunting at first, but with a clear plan and the right approach, you can create a reliable and efficient piece of equipment. Follow these step-by-step instructions to construct your trommel:
Step 1: Preparing the Drum
- Clean the Drum: Start by thoroughly cleaning your metal drum. Remove any residue or rust to ensure it’s safe and ready for construction.
- Cut the Openings: Using an angle grinder, cut openings on both ends of the drum. One end will serve as the input where material is fed, and the other will be the output where sorted material exits. Ensure the openings are smooth and free of sharp edges.
Step 2: Installing the Screen Mesh
- Measure and Cut the Mesh: Measure the inner circumference and length of the drum, then cut the screen mesh to fit inside. It should line the interior surface completely.
- Secure the Mesh: Attach the mesh to the inside of the drum using bolts and washers. Ensure the mesh is tight and evenly distributed to prevent material from escaping through gaps.
Step 3: Constructing the Frame
- Cut the Frame Pieces: Cut the angle iron or steel tubing to create the frame. You’ll need four vertical supports and horizontal crossbars to form a rectangular base.
- Assemble the Frame: Weld or bolt the frame pieces together to create a sturdy structure that can support the rotating drum. Make sure the frame is level and square.
Step 4: Mounting the Drum
- Install the Bearings: Attach the heavy-duty bearings to each side of the frame. These will hold the axle and allow the drum to rotate smoothly.
- Attach the Axle: Insert the axle through the drum’s center and secure it to the bearings. The axle should be perfectly aligned to ensure smooth rotation.
Step 5: Adding the Motor and Drive System
- Mount the Motor: Secure the electric motor to the frame. Position it so that the drive system (belt or chain) can easily connect to the drum’s axle.
- Install the Drive System: Attach the drive belt or chain to the motor and the drum’s axle. Ensure it is tight enough to transfer motion without slipping.
Step 6: Constructing the Hopper and Chute
- Build the Hopper: Create a hopper to feed material into the drum. This can be made from metal or durable plastic. Attach it securely to the frame at the input end of the drum.
- Build the Chute: Construct a chute to collect the sorted material exiting the drum. Position it at the output end and ensure it directs material to a designated collection area.
Step 7: Final Assembly and Testing
- Secure All Components: Double-check all bolts, screws, and welds to ensure everything is securely fastened.
- Test the Trommel: Run the trommel with some test material to check its operation. Adjust the motor speed and ensure the drum rotates smoothly without any wobbling.
- Make Adjustments: If needed, make adjustments to the drum alignment, drive system tension, or frame stability to optimize performance.
By following these steps, you’ll be able to construct a functional and efficient trommel for your gold prospecting activities. Proper assembly and testing will ensure that your trommel operates smoothly and efficiently, making your gold hunting efforts more productive.
Optimizing Your Trommel for Maximum Gold Recovery
Once you've constructed your trommel, the next step is to ensure it operates at peak efficiency. Optimizing your trommel can significantly enhance its performance, making your gold prospecting efforts more productive and enjoyable. Here are some key tips and tricks to maximize your trommel’s efficiency:
Proper Drum Rotation Speed
The rotation speed of the drum is crucial for effective material separation. Too slow, and material may not tumble enough to separate properly; too fast, and material might be flung out of the drum. The optimal speed varies depending on the material you're processing, but a general guideline is around 10-20 RPM. Use the variable speed controller on your motor to fine-tune the rotation speed until you achieve the best results.
Screen Mesh Size
Choosing the right screen mesh size is essential for effective sorting. The mesh size should match the size of the gold particles you aim to recover. Smaller mesh sizes can catch finer particles but may slow down processing time, while larger mesh sizes allow for faster processing but may miss smaller pieces of gold. Experiment with different mesh sizes to find the best balance for your needs.
Regular Maintenance
Regular maintenance is key to keeping your trommel in top condition. Inspect the drum, screen mesh, and drive system regularly for wear and tear. Replace any worn or damaged parts promptly to avoid breakdowns during use. Keeping the drum and mesh clean is also important; clogged or dirty screens can reduce efficiency and effectiveness.
Feed Rate and Material Preparation
The rate at which you feed material into the trommel can impact its performance. Overloading the trommel can cause it to clog and reduce sorting efficiency. Feed material at a steady, consistent rate to allow for optimal tumbling and separation. Additionally, pre-screening your material to remove large rocks and debris can improve the trommel's efficiency and reduce wear on the drum and screen mesh.
Angle of the Trommel
The angle at which your trommel is set can affect material flow and separation. A slight incline, typically between 5 to 10 degrees, allows material to move through the drum at a controlled rate, enhancing sorting efficiency. Adjust the angle as needed to optimize material flow and maximize gold recovery.
Water Usage
For wet processing, the use of water can greatly improve the trommel's ability to separate fine gold particles. A steady stream of water can help wash away lighter material, leaving the heavier gold particles behind. Ensure that your water source is clean and consistent, and adjust the water flow to match the amount of material being processed.
Experimentation and Adjustments
Optimizing your trommel often involves some trial and error. Don’t be afraid to experiment with different settings, mesh sizes, and feed rates to find the most effective combination for your specific prospecting conditions. Keep detailed notes of your adjustments and results to refine your process over time.
By implementing these optimization strategies, you can enhance the performance of your homemade trommel, making your gold prospecting endeavors more efficient and successful. Regular maintenance, careful adjustments, and a bit of experimentation will ensure that your trommel operates at its best, maximizing your chances of finding gold.
Final Thoughts
Building your own trommel for gold prospecting is a rewarding and cost-effective project that can significantly enhance your gold recovery efforts. By carefully selecting the right materials and tools, following a clear and detailed construction plan, and optimizing your trommel's performance, you can create a highly efficient piece of equipment tailored to your specific needs.
Remember, the key to a successful trommel lies in the details. From the rotation speed of the drum to the mesh size and the feed rate, each element plays a critical role in the efficiency and effectiveness of your trommel. Regular maintenance and a willingness to experiment with different settings will ensure that your trommel operates at its best, providing you with consistent and reliable results.
Whether you're a seasoned prospector or new to the hobby, the satisfaction of using a trommel you built yourself cannot be overstated. It not only saves money but also gives you a deeper understanding of the gold prospecting process. Plus, the skills and knowledge gained from this project can be applied to other DIY ventures, further expanding your capabilities and confidence.
In summary, constructing and optimizing your trommel can transform your gold prospecting activities, making them more productive and enjoyable. By investing time and effort into building a high-quality trommel, you'll be better equipped to uncover those hidden treasures and strike it rich on your gold hunting adventures. Happy prospecting!